Synthetic data#
Why synthetic data?#
Computer vision algorithms recently became really performant. The tasks of classification, segmentation or detection can now be performed with high precision on numerous classes of objects. Yolov8 is a good example of such algorithms, and Ultralytics provides various weights files trained on the COCO Dataset.
However, those performances can—at least for now—only be achieved by the mean of really large annotated datasets of images. Indeed creating such datasets can be really time consuming and expensive, even for a single class of object: we need to find large quantity of images containing the objects of interest and to manually annotate them.
To overcome the difficulty of assembling large datasets, we propose a method of synthetic data generation to obtain many automatically annotated images.
Generating massive amount of synthetic data#
Generalities#
The idea is to use png images containing only the objects of interest with an alpha mask, and to copy-paste them onto backgrounds, with random sizes, positions and rotations. Using the alpha mask properties of the png files, we can automatically annotate the objects with Opencv and generate bounding boxes to train a detector, or segmentation masks to train a segmentation model.
Such png images can be generated using 3D modeling softwares such as Blender, or any 2D graphics editors such as Gimp, Adobe Photoshop, etc. (or even Opencv) in the case of purely 2D objects.
The simple case: 2D objects#
Overview#
The method described in this section is implemented in a set of scripts abailable in this Gitlab repository. Those scripts was initially written to generate data to train a Yolov5 or Yolov8 model, but you can adapt them to suit your needs.
In this tutorial you will see how to generate data to train Yolov8 detector and segmentation models destined to highlight grayscale sights in the context of project OAK.
In the directory base_data of the Gitlab repository you will find samples of data to generate the dataset: raw_sight contains the base png image of the grayscale sight and videos contains a sample video which we will extract frames to generate background images.

Base png image contained in base_data/raw_sight#
The directory params contains the parameter files with which we will configure the amount of images, objects by image, boundaries for random rotations and sizes, etc.
Generating background images#
The first step is to generate backgrounds. A simple method is to extract images from videos, like you can do with the script videos_to_backgrounds.py. Just set your parameters in params/config.yml:
videos_to_backgrounds:
   input_dir: "base_data/videos" # input directory where you have put your videos
   archive_dir: "base_data/archived_videos" # archive directory, where processed videos are moved
   backgr_dir: "backgrounds" # directory for the backgrounds (in data)
   frames_to_skip: 10 # frames to skip to ensure sufficient differences between backgrounds
   delete_previous: true # delete previously generated backgrounds
   flipped: true # flip every image along the vertical axis to double the amount of data
Add videos (in .mp4, .MP4 or .webm. format) in the directory base_data/videos and launch the script with the following command:
just generate_backgrounds
Extracted images will be stored in data/backgrounds (as set in params/config.yml), and each video will be moved to base_data/archived_videos when they are fully extracted. By setting delete_previous: false, you can add videos in base_data/videos afterwards and increase the number of background images.

Background example extracted from the video sample#
Generating random perspectives and illuminance for a 2D object#
In the case of a purely 2D object to detect or segment, it may be useful to simulate some random perspective and lighting. You can set the desired parameters in params/config.yml:
generate_objects:
   dir_name: "sight" # directory name for output (in data)
   delete_previous: true # delete previously generated data in output_folder
   nb_processes: 16 # number of parallel processes, to speed up the data generation
   nb_obj: 100 # number of objects/png images to generate
   rot_x_min: -70 # min rotation along x axis (in 3D)
   rot_x_max: 70 # max rotation along x axis (in 3D)
   rot_y_min: -70 # min rotation along y axis (in 3D)
   rot_y_max: 70 # max rotation along y axis (in 3D)
   rot_z_min: 0 # min rotation along z axis (in 3D)
   rot_z_max: 360 # max rotation along z axis (in 3D)
   dist_min: 1.5 # min distance for 2D->3D projection (normalized by img size)
   dist_max: 5 # max distance for 2D->3D projection (normalized by img size)
   dist_focal_ratio: 0.75 # focal_length=dist_focal_ratio*dist (for 2D->3D projection)
   min_gamma: 0.5 # min gamma
   max_gamma: 2.5 # max gamma
   gamma_transform: true # apply random gamma between min_gamma and max_gamma
   crop: true # crop image around the object
   seed: 12345 # random seed, to reproduce results
   base_image_path: "base_data/raw_sight/sight.png" # path to the base image
And generate some random objects with the following command:
just generate_objects
The png files are stored in the data/dir_name.

Example of generated object with random perspective and illuminance#
Generating a complete dataset#
The idea here is to copy-paste the objects we have generated onto the backgrounds, with random rotations, sizes and positions. The annotation is automatically performed using the alpha mask of the png files.
In params/config.yml you can set the train/val/test ratios, the final image size, etc.
generate_dataset:
   dataset_type: "detect" # model type: detect/segment
   plot_label: false # plot bounding boxes/segmentation masks for verification
   tot_img: 10 # Total number of images in the dataset
   im_size: 640 # final size of images
   tmp_size: 2560 # temporary size, set tmp_size > im_size to avoid artifacts
   delete_previous: true # delete previously generated dataset
   nb_processes: 16 # number of parallel processes, to speed up the data generation
   train_ratio: 0.8 # ratio of images to put in train
   val_ratio: 0.2 # ratio of images to put in val
   test_ratio: 0. # ratio of images to put in test
   obj_overlap: 0.4 # overlap tolerated between objects
   augment: true # apply Albumentations augmentation
   dataset_path: "dataset" # dataset directory
   backgr_dir: "backgrounds" # backgrounds directory (in data)
   seed: 12345 # random seed, to reproduce results
   classes:
      sight:
         class_nb: 0 # Class number
         obj_dir: "sight" # objects directory (in data)
         nb_obj: 150 # number of objects to add to backgrounds
         apply_rotation: true # apply random rotations
         min_rot: 0 # min angle for random rotations
         max_rot: 359 # max angle for random rotations
         min_obj_size: 0.1 # min object size (as background ratio)
         max_obj_size: 0.8 # max object size (as background ratio)
         annotate: true # Create annotation
In the section classes you can add classes of objects to detect or segment. You can chose min. and max. random sizes, and if you want to apply random rotations.
If there is not enough png files for one class, some files may be used multiple times but with different sizes, rotations and final positions.
Set a greater obj_overlap to increase possible occlusion between the objects. You can add non-annotated classes by setting the parameter annotate: false to add some random occlusion to your data. Pay attention to the fact that a small obj_overlap value may not be compatible with your objects sizes. The script will try to find suitable positions for the objects to meet the overlap limit, but if it cannot find a good fit in 100 iterations it gives up and keeps positions with a greater overlap.
You have to ensure that train_ratio + val_ratio + test_ratio = 1.
If you want to add you own classes you just have to modify the config file, e.g. like this:
classes:
   human:
      class_nb: 0 # Class number
      obj_dir: "humans" # objects directory (in data)
      nb_obj: 150 # number of objects to add to backgrounds
      apply_rotation: false # apply random rotations
      min_rot: 0 # min angle for random rotations
      max_rot: 359 # max angle for random rotations
      min_obj_size: 0.2 # min object size (as background ratio)
      max_obj_size: 0.7 # max object size (as background ratio)
      annotate: true # Create annotation
   cat:
      class_nb: 1 # Class number
      obj_dir: "cats" # objects directory (in data)
      nb_obj: 150 # number of objects to add to backgrounds
      apply_rotation: true # apply random rotations
      min_rot: -10 # min angle for random rotations
      max_rot: 10 # max angle for random rotations
      min_obj_size: 0.1 # min object size (as background ratio)
      max_obj_size: 0.5 # max object size (as background ratio)
      annotate: true # Create annotation
You can change augmentation parameters for the Albumentations module by modifying the transform section in the config file.
Generate the entire dataset with the command:
just generate_dataset
When creating really large datasets (e.g. with a total of more than 100 000 images) you may want to increase nb_processes to take profit of the multiprocessing capabilities of you PC. A good value is nb_processes ≤ nb_cores, where nb_cores is the number of cores avaible on your CPU.

Example of final image contained in the dataset#
Run the entire pipeline#
You can run the entire data creation pipeline with the following command:
just generate-all
Cleaning data#
Clean the generated data with just clean-data, or with just clean if you also wish to remove the virtual environment.
The hard case: 3D objects#
Overview#
The pipeline presented above can be reused to create datasets for 3D objects. However, the creation of png files containing the objects to copy-paste onto the background images is far more complicated than just using a script to generate random perspectives and illuminances.
If the process is more complicated for 3D objects than for 2D objects, it is still worth the effort as the generation of an entire dataset remains cheaper and less time consuming than assembling and annotating a dataset of ‘real’ images.
In this case, the objects must be created using a 3D modeling software such as Blender.
An example of synthetic dataset creation for firearms detection#
Blender is a useful tool to create synthetic data because it is oriented towards scenes creation. Indeed, to have a good variety of png objects, it is necessary to vary the angle of view, lights, the focal length, and even parameters of the objects itself, if the real ones have form and color variety. Once the scene is scripted, the images can be exported to png files.
Note
Blender has its own Python API to facilitate scene automation and png exportation.
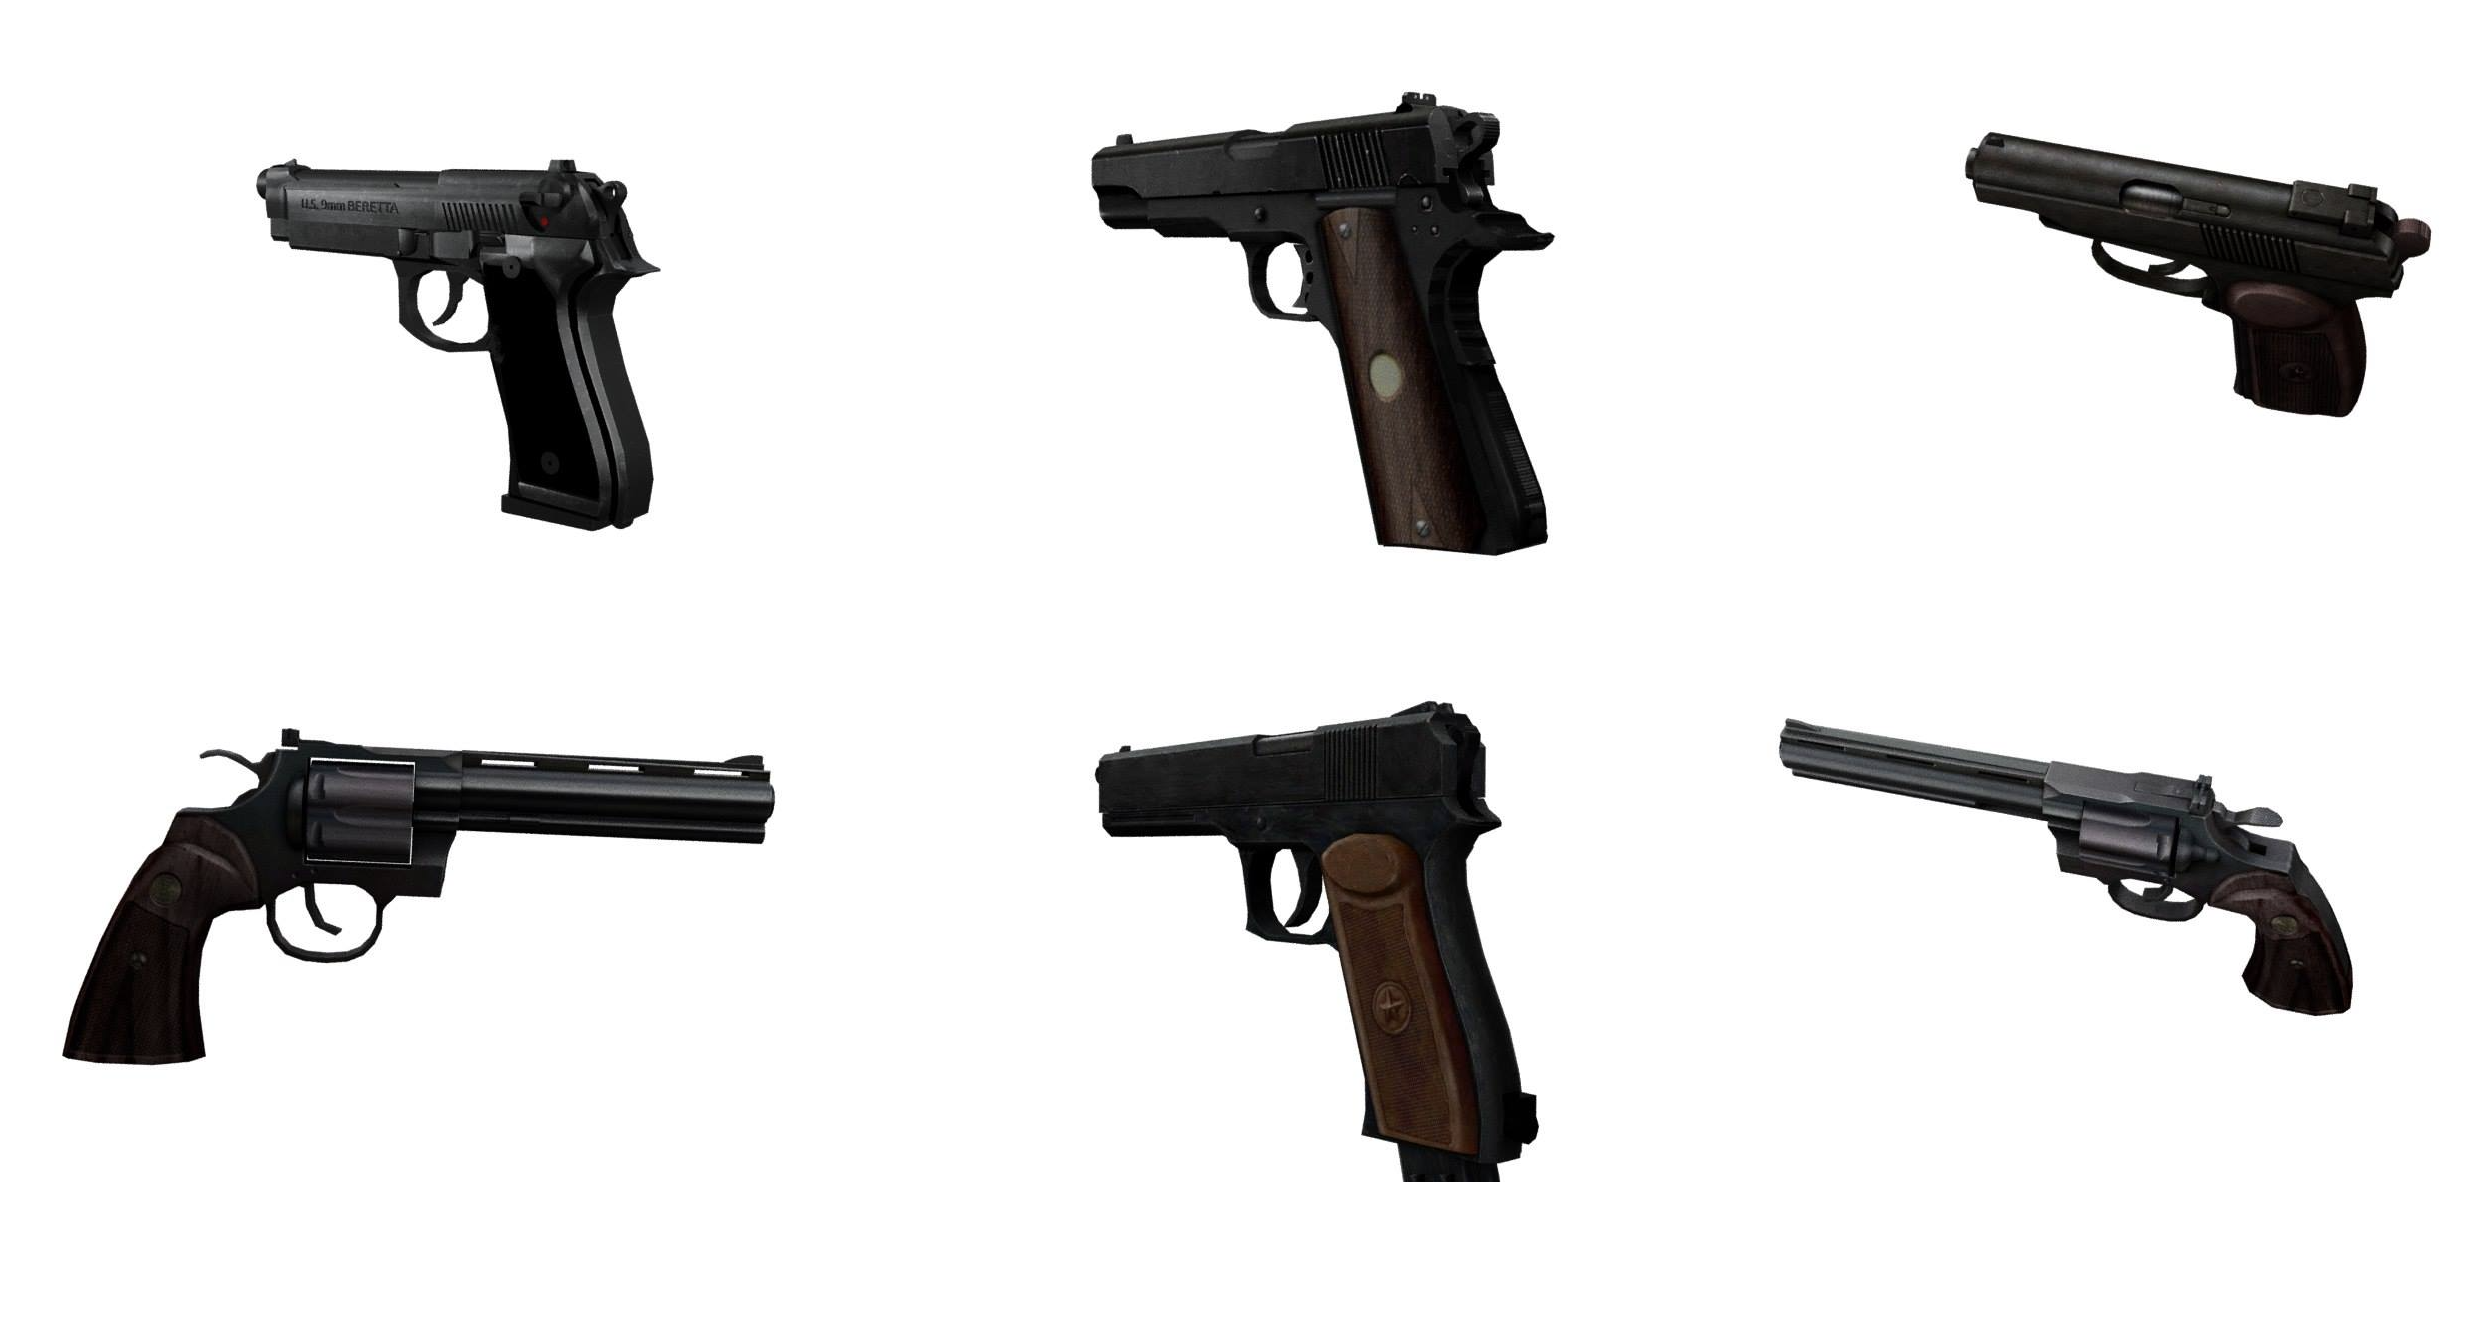
Example of png images generated with Blender#
Once the png files has been created, the procedure is the same as in the 2D case: one can add the classes in the config file (params/config.yml) and generate the dataset with the command just generate_dataset.

Example of result obtained after training a Yolov5 model on 700 000 images containing 1.4M objects in total. This detection was given by a Kalman-filtered version of Yolov5, hence the two confidence scores.#